Introduction
This article shows how to get help in PerfectGym and to use Get Support. It has been created to allow you to quickly and easily find answers to the most common questions related to configuration and use of the PerfectGym Manager system and other modules and applications. Get Support tool also allows you to report bugs and solve more serious problems related to the system operation.
Before you start
Check if you have proper employee permissions. You can do it by yourself, or ask your manager, or system Administrator for help.
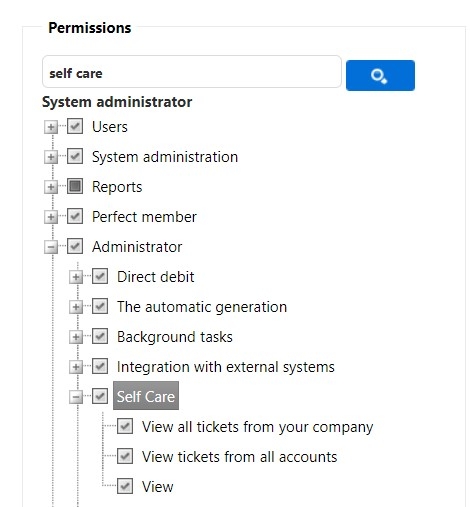
- To check system permissions on your own, go to the PGM -> Clubs -> System permissions. Click on the Permissions button on the left of your role. In the search bar, enter the phrase self care. You can also search for it manually: Administrator -> Self Care.
- Please note that different roles can have a different set of permissions to view the module/view tickets created by others/create tickets:
Get Support tool - What's that?
Get Support is a quick and easy tool to get help in PerfectGym.
It enables you:
- Self-study on the functionalities and usage of the system,
- Access to tutorials, system configuration instructions and capabilities usage examples,
- The possibility of asking quick questions and contacting the Perfect Gym Support Team,
- Creating Support Tickets in case of more difficult issues concerning system and application operation,
- Reporting bugs that limit or prevent the operation of the system and applications.
Where can I find Get Support tool?
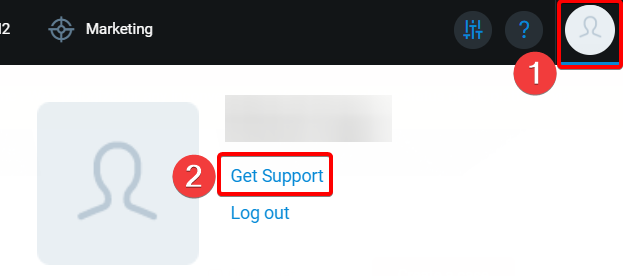
You can find it in the PGM, on the top-right side in the main menu tab, under the user picture icon.

How can I use Get Support tool?
You can use the Get Support tool in three ways:
- Search the Knowledge Base, read instructional articles and follow How-to manuals,
- Start a chat session with a Live agent, track conversation history and get an instant reply to your inquiry,
- Start a chat session with the Perfect Bot, track conversation history, and get an instant reply to your inquiry,
If the chatbot is unable to answer your question, it will open a Support Case for you automatically.
- Create a Support Ticket and monitor the case status.
Knowledge Base - What's that and how can it help?
Knowledge Base provides you instructional articles and How-to manuals in response to the most common questions. It is the first source of information about Perfect Gym system and application. It consists of four parts:
- Fundamentals - it describes how to configure and use the PGM system and other, most frequently used modules,
- Add-ons - it describes the configuration and use of additional modules and applications,
- Integrations - it describes the possibility of connecting with external devices and third-party software,
- How we work - it deals with the rules of cooperation with Perfect Gym and includes information on getting support in Perfect Gym.
Knowledge Base will help you when you are looking for system configuration instructions, want to check if the settings you have used are correct, or when you search for information on new functionalities and want to learn more about the possibilities of using the system.
How to use Knowledge Base?
- If your query is detailed and concerns a specific function - enter a keyword in the search box and press "Enter". In the results list you will find the articles that suit your query the most.
- If your query is more general - go to the main menu and select the appropriate module or application. You will be redirected to the table of contents. Select the area you are interested in and click on the article.
- If you have not found a solution - go to chatbox!
Open Chat
When to use the LiveChat?
This option is available for enterprise and AUS clients.
Use the chatbox if you want to get a quick response to direct questions, i.e. where to find a certain functionality.
How to use the LiveChat efficiently?
This option is available for enterprise and AUS clients.
Try to describe your question in a simple but comprehensive way. You can take and attach photos or screenshots to show which functionality you are referring to. You can use a free program, such as Screenpresso, or keyboard commands for Windows or MacOS. Remember that the more information you provide, the more precise answer the Perfect Gym Support Team will be able to provide.
The chat transcript will be available in GetSupport message 1 hour after your conversation with an agent.
Important: If you get the "Leave a message" or "Our agents are not available" note in the Chatbox, your inquiry will create a Support Ticket and a new case will be automatically submitted; however, you will not be able to see it in the Get Support tool until after the Perfect Gym Support Team has seen it.
When to use the Perfect Bot?
This feature is available for non-enterprise customers.
Use the Chatbot if you want a quick response to direct questions, such as where to find a specific functionality, or if you encounter technical problems that require deeper investigation. If Perfect Bot is unable to understand or provide an answer, it will ensure you’re connected to someone who can help.
How to use the Perfect Bot efficiently?
This feature is available for non-enterprise customers.
Ask simple, direct questions one at a time for faster responses. If you need to upload pictures, you can add them through Get Support by editing an existing case. Go to this article, to learn more about Perfect Bot.
Support Ticket - When to use it?
This option is available for enterprise and AUS clients.
Submit a Support Ticket and create a case if you:
- have searched the Knowledge Base, but did not find the right answer to your question,
- were not able to reach us on Chat,
- have talked to us on Chat, but your issue could not be solved that way,
- your case concerns a bug or system failure.
Important: Before submitting a Support Ticket, please see the severity levels definitions, so that you knew, which priority to declare for your case.
How to properly submit Support Ticket?
- Press Create a case in the top right corner.
- In a new window, which will open, provide us as much information as possible on your case.
- You can also attach screenshots by dragging photo files into the attachments area. To do so, you can use a free screenshot capturing program, e.g. Screenpresso, or the keyboard commands for Windows or Mac OS.
- If you need us to connect to your PC, please include your current Team Viewer ID and Password.
3. Press the Send button. This will create the case with a unique case number.
When case status will be set to Qualified, you can be sure, that the Support Ticket was submitted properly.
There are two types of cases. Choose the one, which applies to your needs:
| Type | Description |
|---|---|
| Inquiry | a question or request for information about something within the system |
| Change Request | a request to introduce changes in the system configuration |
How to reply to and manage a case?
You will see a case counter to help you get around the Statuses of each of them.

1. Waiting for Reply - take an action!
In most cases, you'll have to add more information to your case:
- Press the Conversation button for your case.
- Fill in the Message box with all the necessary information and press Send.
- You can also attach files to this message by pressing Add Files.
Important: Not taking action by you while in the status "Waiting for Reply" may result in closing the case by the Perfect Gym Support Team after a week!
Important: The case cannot be closed by you when its status is "In Progress" or "Waiting for Reply". If you want to close the case, please send a new message via the "Conversation" box and ask the Perfect Gym Support Team to close your case.
2. Solution proposed - view your case and apply the solution.
- If you are happy with the solution and your inquiry has been solved, press the Close Case button.
- If you want to get back to the case after some time, scroll down the Issue box.
3. Closed (Duplicate) status - scroll down the History tab. Here, you can see all your submitted and closed cases as well as all existing conversations that you have had with the Perfect Gym Support Team.
4. All Accounts - this tab will allow you to search all cases made by any employee within your business. It applies if your business operates in more than one country
5. Automate Closure - be aware that the system might close the case automatically if you do not respond/react for 7 days.
If your case is critical (as in the definition of the critical severity level in Terms and Conditions), please contact the Perfect Gym Support Team immediately.
Updates
From R.89 system update, we have made some significant visual changes and introduced new enhancements to the Get Support module. The aim is to improve the overall user experience and provide a more organized and streamlined view of case details.
Here are the vital changes:
- Acceptance of Proposed Solution - a new feature that allows users to accept proposed solutions directly within case details. You and your team can indicate your acceptance of a proposed solution, providing clearer communication between you and our Perfect Gym Support Team.
- Enhanced Case Details View - the width of the case details view has been increased to provide a more spacious and comfortable reading experience. We have also grouped the information into four sections: Basic Info, Case Info, Conversation, and Case History.
- Improved Case Header - you can add the subject of the case to the top of the case details view. This change allows for identifying the main topic or problem quickly. We have included the case reporter's information, providing immediate access to the contact details of the person who raised the case. The message associated with the case has now been placed at the top, ensuring that the important communication is easily visible.
- History of the case - we have relocated the history of the case to the bottom of the case details view, providing a chronological overview of all actions taken.
- Right Sidebar - we have introduced a new right sidebar that displays additional information about the case: the details such as case type, number of attachments, and TeamViewer information, enabling users to access relevant information at a glance. These visual changes and feature additions aim to optimize the Get Support module, making it more user-friendly and efficient for handling customer cases. We believe that these improvements will enhance your experience and help you manage your cases more effectively.
